
20 Easy Homemade Popsicle Recipes
Nothing from the store comes close to the deliciousness of these homemade popsicle recipes, I promise. Ready-made popsicles are usually either full of sugar and preservatives or super expensive. But if you can make an all-natural recipe with just a few cheap ingredients, why waste your money?
Naturally, you’ll need popsicle molds. Try to find something BPA-free and dishwasher safe if possible.
I love these Tovolo ice pop molds, which are available in fun shapes, including tiki, monsters, zombies, dinosaurs, and robots. Whatever shape you choose, I guarantee you’ll want to try every one of these 20 fantastic popsicle recipes.
Pumpkin Pie Popsicles – With just 5 ingredients and about 10 minutes, you can have a batch of these pumpkin pie-flavored popsicles chilling in the freezer. They use real pumpkin puree, so if you make your own, I suggest running it through a blender to ensure there are no lumps. Of course, you can blend the pumpkin, milk, vanilla pudding, nutmeg cinnamon, allspice, cloves, cardamom, and ginger and strain it, too, if you want it to be extra smooth.
Ingredients
- 1 cup canned pumpkin puree, not pie filling
- 1 1/2 cups milk, whole or low fat
- 1 box, 3.4 oz instant vanilla pudding
- 1/4 tsp each: nutmeg, cinnamon, allspice, cloves and cardamom
- 1/2 tsp ginger
Instructions
- Whisk all the ingredients together until smooth.
- Fill popsicle molds to the top, and rap the mold firmly on a hard surface to remove any air bubbles. I found the easiest way to do this was to spoon the mixture into a large baggie, cut off the tip, and squeeze it into the molds. You can also use small paper cups as molds.
- Position the popsicle sticks (they will stand up by themselves because the mixture is thick) and freeze at least several hours until solid. You will not need the lid for these pops.
- To remove the popsicles from the mold, fill the sink with hottest tap water and submerge the mold just up to, but not over, the top lip. Hold it in the water for several seconds, and then try to wiggle the popsicles out. If they don’t budge, submerge the mold again briefly.
Peaches and Cream Cobbler Popsicles – In this recipe, you’ll have layers of peach cobbler filling and creamy ice cream. The cobbler filling can be left chunky if you want, or you can blend the peaches, spices, brown sugar, and water. For added flavor, try folding through some crushed graham crackers.
Ingredients
- 4 cups peaches chopped
- 2 teaspoons nutmeg
- 1 ½ teaspoons cinnamon
- ½ teaspoons all spice
- 2 tablespoons brown sugar
- 3 tablespoons water
- 1 cup heavy cream half-and-half or milk
- 3 tablespoons honey
- ¼ teaspoons vanilla extract
Instructions
- In a blender, puree the peaches, spices, brown sugar and water.
- In a bowl, combine the heavy cream, honey and vanilla extract until the well blended.
- In a popsicle mold, alternate between the peach cobbler mixture and the cream mixture. Once the mold’s are full, use a knife or a straw to swirl everything around a bit. Add popsicle sticks.
- Freeze 2 to 3 hours. Use lukewarm water to release popsicles from the molds by gently submerging the mold, careful to only keep the water below the top line.
- These popsicles can be stored in a ziplock bag in the freezer.
Easy Watermelon Popsicles – These watermelon popsicles are a simple mixture of watermelon and lime juice. Blitz them together and freeze for a super clean cold treat. If you want them creamy, try blending them with coconut milk.
Instructions
- Add watermelon, 2 Tbsp granulated sugar and lemon juice to a blender and blend until well pureed. Skim off foam then carefully pour into 10 popsicles molds filling each about 2/3 full (try not to splash on sides, I found it worked best to let it run down the outside edge then just wipe off that part later with a damp paper towel or q-tip).
- Sprinkle the chocolate chips over tops then using a popsicles stick gently push down to immerse chips (push towards sides so you can see them once the freeze). Wipe sides clean as needed. Cover with the lid and insert popsicles sticks. Freeze 3 1/2 hours.
- During last 30 minutes of popsicles freezing, whisk together coconut milk with 1 1/2 Tbsp sugar until sugar has dissolved, chill 30 minutes (you want it to be a nice pourable consistency after chilling, not too thick. If you find that it is stir in 1 – 2 Tbsp cold water to thin. I recommend chilling it because you just don’t want it warm or it will melt the watermelon layer when pouring in).
- Remove popsicles from freezer, remove lid and carefully pour a scant tablespoon coconut milk into an even layer over watermelon layer (again, it works best to pour it down the outside edge then wipe clean). Clean sides as necessary. Return to freezer, uncovered, and chill 45 minutes.
- Meanwhile, cut tops from kiwi and use a spoon to scoop flesh from kiwi while leaving skins. Transfer kiwi to blender along with 2 Tbsp granulated sugar. Pulse until well pureed. Force mixture through a fine mesh strainer into a bowl using a rubber spatula to remove seeds (at this point I mixed int just a tiny bit of blue gel coloring because mine weren’t the best shade of green, so that’s optional). Chill kiwi mixture 30 minutes.
- Remove popsicles from freezer and carefully pour about 1 Tbsp kiwi mixture over coconut layer. Return to freezer and chill until popsicles are solid about 2 – 3 hours.
- To remove popsicles from molds, turn tray to the side and run plastic molds under warm water several seconds (don’t let the water touch the kiwi portion at the top) then slowly pull from mold
Lemonade Popsicles – Nothing is more refreshing on a hot day than a big glass of lemonade, except maybe a cool lemonade popsicle, that is! Making lemonade at home is as easy and stirring lemon juice with sugar and water. Taste it as you go and add extra sugar if you think it needs to the sweeter. Throw in a few fresh raspberries.
Ingredients
- 1/2 cup lemon juice
- 1/2 cup sugar
- 1 3/4 cups cold water
Instructions
- Whisk together the lemon juice and sugar until the sugar has completely dissolved into a syrup.
- Add the syrup to the cold water and mix thoroughly.
- Pour into popsicle molds.
- Freeze for 1 hour, place the sticks and then freeze overnight (or for at least 3 hours, but best overnight).
- To remove from mold, allow the popsicles to sit at room temperature for 5 minutes and then pull up on the stick the same time as you push up from the bottom.
- Place in a plastic bag and store in the freeze
Honeydew Melon Popsicles – You won’t be surprised to see strawberry and chocolate on this list, but have you ever tried melon popsicles? The flavor is subtle, but one bite, and you’ll know exactly what it is. When melons are in season, it’s the perfect time to give this recipe a go. Depending on how ripe your melons are, you may find you won’t need to add the maple syrup. I would taste the mixture first and add it a little at a time, so it’s not too sweet.
Ingredients
- 2 cups honeydew melon, chopped
- 1 cup canned coconut milk Full fat will yield creamier pops.
- ¼ cup maple syrup
- ¼ cup coconut flakes optional
Instructions
- In a blender combine honeydew, coconut milk, and maple syrup until smooth and creamy.
- After mixture is blender add coconut if using, and stir to combine.
- Pour mixture into popsicle molds leaving a little room for expansion as it freezes. I filled 6 molds.
- Place in freezer for at least 4 hours or until thoroughly frozen.
- To easily remove popsicle from mold place under warm running water for a few seconds.
4-Ingredient Healthful Fudgesicles – didn’t think that the words healthy and fudgesicles would ever go in the same sentence, but this recipe proved me wrong. But how can you make something creamy and rich and delicious and healthy? It’s easy, and you’ll use coconut milk and cocoa powder. Maybe “healthy” is a stretch, but these are definitely better for you than the sugary ones you get in the store.
Ingredients
- 1 13.5 oz. can full-fat coconut milk, at room temperature
- ½ cup dark cocoa powder
- ⅓ cup + 2 tbsp pure maple syrup, optional*
- 2 scoops Chocolate + Sea Salt Cleanish Plant-Based Protein Powder
- 2 tsp pure vanilla extract
Instructions
- Add all of the ingredients into a blender, and blend until smooth. *For the maple syrup, add the additional 2 tbsp if you prefer a sweeter fudgesicle, and omit if you prefer a darker chocolate fudgecicle.
- Pour the mixture into a popsicle mold. We used this one.
- Freeze for at least 4 hours or overnight.
- Make sure everything is all blended, this will eliminate any chunks or unwanted clumps.
- Pour each fudgesicle completely before moving onto the next.
Chocolate Peanut Butter Banana Popsicle – You probably already know that frozen bananas turn into the creamiest, most delicious, all-natural ice cream when you blend them until smooth. It makes sense that you can make some terrific popsicles using frozen bananas as a base. Along with some dairy-free milk to help thin it down and some peanut butter, you’ll add a mixture of cocoa powder, maple syrup, and coconut oil. Blend until smooth and pour into your molds.
Ingredients
- 1 13.5 oz. can full-fat coconut milk, at room temperature
- ½ cup dark cocoa powder
- ⅓ cup + 2 tbsp pure maple syrup, optional*
- 2 scoops Chocolate + Sea Salt Cleanish Plant-Based Protein Powder
- 2 tsp pure vanilla extract
Instructions
- Add all of the ingredients into a blender, and blend until smooth. *For the maple syrup, add the additional 2 tbsp if you prefer a sweeter fudgesicle, and omit if you prefer a darker chocolate fudgecicle.
- Pour the mixture into a popsicle mold. We used this one.
- Freeze for at least 4 hours or overnight.
- Make sure everything is all blended, this will eliminate any chunks or unwanted clumps.
- Pour each fudgesicle completely before moving onto the next.
Nutella Popsicles – To ensure that flavor shines, all you’ll add to the Nutella is milk and a touch of heavy cream. It will leave these creamy and fudgy.
Ingredients
- 175 g Nutella
- 250 ml Milk
- 4 tbsp Double cream
Instructions
- Add the ingredients to a large mixing bowl and whisk together until fully combined
- Pour the mixture through a fine sieve into a jug. You don’t have to sieve the mixture but it helps to make it smoother
- Pour the mixture in the popsicle/lolly mould
- You can add the lolly sticks straight away, or wait for an hour or so, then add them as this can help the sticks stay straighter
- Freeze for 4-6 hours
- To remove the lollies from the mould, run warm water over the mould and pull the popsicles out by their sticks
- Store them in an airtight container or a freezer bag in the freezer for 3 months
Cookies and Cream Popsicles As much as I love velvety smooth sorbet and gelato, I also love the texture. Some of my favorite frozen treats are a mixture of creamy ice cream and something crunchy. Cookie and cream is close to the top of that list. What I love most about this recipe is that it’s close to a no-bake, frozen cheesecake. You’ll use cream cheese, yogurt, milk, and sugar for a thick and decadent popsicle base. When it comes to the cookies, I like to use crushed Oreos and chunks.
Ingredients
- 1 1/2 cups vanilla yogurt
- 1/4 cup cream cheese – softened, about 2 oz
- 1/4 cup milk – or you can substitute a dairy-free option here
- 2 tablespoons sugar – or honey
- 1 teaspoon vanilla extract
- 1/4 cup crushed Oreos – about 4 cookies, plus 1 whole cookie for each popsicle well
Instructions
- In a medium bowl whisk together the yogurt, cream cheese, milk, sugar, and vanilla extract. Once smooth stir in the crushed cookies.
- Pour into the popsicle molds, leaving a little space at the top for them to expand.
OR you can place a whole cookie into each mold for a hidden treat by filling the molds halfway, setting the cookie inside the mold, then topping off to fill each well.
- Tap firmly on the counter to remove bubbles.
- Insert sticks and freeze until hard (at least 4 hours).
- Remove from the freezer and run the mold under warm water for a few seconds to loosen the popsicles from the mold, then gently pull on the popsicle stick to remove from the mold completely.
Dairy-Free Pineapple Popsicles These popsicles use real pineapple for a kick of fruity flavor. Instead of vanilla ice cream, you’ll add coconut milk and, interestingly, vodka. If you’ve ever made popsicles at home only to find they freeze too hard, try adding a splash of vodka to the mix. Of course, you won’t taste it, and you won’t get drunk. But it will keep the mixture from freezing all the way.
Ingredients
- 1 1/2 cups vanilla yogurt
- 1/4 cup cream cheese – softened, about 2 oz
- 1/4 cup milk – or you can substitute a dairy-free option here
- 2 tablespoons sugar – or honey
- 1 teaspoon vanilla extract
- 1/4 cup crushed Oreos – about 4 cookies, plus 1 whole cookie for each popsicle well
Instructions
- In a medium bowl whisk together the yogurt, cream cheese, milk, sugar, and vanilla extract. Once smooth stir in the crushed cookies.
- Pour into the popsicle molds, leaving a little space at the top for them to expand.
- Tap firmly on the counter to remove bubbles.
- Insert sticks and freeze until hard (at least 4 hours).
- Remove from the freezer and run the mold under warm water for a few seconds to loosen the popsicles from the mold, then gently pull on the popsicle stick to remove from the mold completely.
Homemade Strawberry Popsicles Although this recipe does include sugar, it’s primarily pure strawberries. They need that little bit of sugar to help draw out their natural juices, making them even tastier. Let the chopped berries macerate in the sugar for at least 30 minutes before blending with the water. I like to leave this a little chunky, including lime juice for a citrus note.
Ingredients
- 2 pounds fresh strawberries, washed, hulled and roughly sliced
- 1/4-1/2 cup sugar start with 1/4 cup and add more to taste
- 1 cup water
Instructions
- Mix together strawberries and sugar and allow to set for 15-20 minutes. You want the sugar to draw out the juices from the strawberries. Add more sugar to taste if desired.
- Pour strawberries into blender and blend with 1 cup water. Blend until desired textured is achieved. We prefer our popsicles to have some tiny strawberry pieces in them.
- Pour into ice cream molds and freeze until solid.
Spiced Chai Popsicles The word chai means tea, so you can expect it to have notes of earthy black tea leaves whenever you order something chai. It’s usually made with milk, which is why you’ll see so many chai lattes on coffee shop menus. Spiced chai is a milky tea with warm spices, like cardamom, cinnamon, cloves, and ginger. And then here, the recipe calls for cashew milk for a lovely nutty flavor, too.
Ingredients
- 2 ¼ cups water
- 2 bags chai tea
- 2 ¼ cups milk
- 1 teaspoon cinnamon, ground
- ½ teaspoon nutmeg, ground
- ½ teaspoon cardamom, ground
- ½ teaspoon ginger, ground
- ⅛ teaspoon allspice, ground
- ⅛ teaspoon cloves, ground
- 4 teaspoons pure maple syrup
Instructions
- In a medium-sized pot add 2 ¼ cups water and bring to a boil. Add spices and whisk. Add 2 tea bags and turn off the heat.
- Allow tea bags to steep for 10 minutes. Lift and squeeze bags to extract remaining liquid into the pot, discard.
- Add 2 ¼ cup milk and 4 teaspoons maple syrup to the pot, whisk to combine. Taste the tea mixture and add more sweetener if desired.
- Evenly distribute the chai tea latte mixture into each popsicle mold. I use about 6 to 7 tablespoons per mold.
- Add the cover, insert sticks and freeze for at least 6 hours or overnight. If you have a hard time getting the popsicle sticks to stay in place, you can wrap some foil on top of the cover then add the sticks through the foil to position it better.
- To remove the popsicles, use warm water over the molds for about 10 seconds, then pull the sticks carefully. Repeat the water process as needed.
- If desired, you can add toppings to your popsicles like a drizzle of melted chocolate and sprinkle with chopped nuts. I used white chocolate and pistachios for my popsicles.
Key Lime Pie Popsicles – Key lime pie is zesty, creamy, sweet, and silky smooth. It almost always calls for condensed milk, which naturally thickens when mixed with the citrus, so you won’t need to bake it. Though you won’t necessarily need these to be thick (since they will end up frozen), condensed milk also adds to the unique flavor, so I wouldn’t substitute it. The crushed graham crackers are a nice touch, and I added some to the mold, too. That way, you’ll get plenty on the top and bottom.
Ingredients
- 1 (14-ounce) can sweetened condensed milk
- 1 1/2 cups half-and-half (or 3/4 cup heavy cream + 3/4 cup whole milk)
- 1 (14-ounce) can sweetened condensed milk
- 1 1/2 cups half-and-half (or 3/4 cup heavy cream + 3/4 cup whole milk)
- 1/2 cup key lime juice
- 2-3 whole graham crackers, crushed
Instructions
- In a medium bowl, preferably one with a spout, whisk together the sweetened condensed milk, half-and-half, and key lime juice.
- Divide the mixture evenly between popsicle molds, leaving a small amount of room at the top. Sprinkle graham cracker crumbs on top of each pop and gently press into the liquid to help freeze them in place. (Note: Do not submerge the graham crackers completely.)
- Top with the popsicle sticks and freeze until solid, at least two hours. To serve, briefly run the molds under warm water to help remove the pops.
- Optional: dip the sides of the pops in additional graham cracker crumbs.
Coconut Popsicles (Paletas de Coco) – You’ve probably noticed that many of these recipes use coconut milk for its creamy base and lightly sweet flavor. But in most cases, you won’t get to taste the coconut. That all changes with this recipe. Between the coconut milk and sweetened shredded coconut flakes, there’s no hiding this tropical beauty.
Ingredients
- 1 (13.5 oz can) full fat coconut milk
- 1 cup sweetened shredded coconut flakes
- 1 (14 oz can) sweetened condensed milk
- 1 cup heavy cream
Instructions
- Combine the coconut milk, shredded coconut, condensed milk, and heavy cream in a blender and blend until all the ingredients are mixed.
- Pour the mixture evenly into each popsicle mold. (I used these). Insert the sticks (if you’re mold has slots of inserting sticks). If you’re mold does not, freeze the popsicles for 2 hours or until they are semi firm and insert wooden sticks in the center. Continue to freeze for at least an additional 4 hours (overnight is best).
- To remove from mold, run the base of the mold under warm water.
- TROPICAL VARIATION: You can also turn these coconut popsicles into tropical coconut popsicles by using a small bullet blender and blending about 1/2 cup of pineapples and then blending 1/2 cup of strawberries. Drop a tablespoon of pineapple blend into the molds, followed by coconut cream mixture, a tablespoon of strawberry mix and then finally, finish it off with a little more coconut cream. You can use a big skewer after you pour everything and give it a swirl for a more tie-dye effect.
Frozen Grapes on a Stick Don’t worry, this recipe isn’t just a bunch of grapes frozen on a skewer. Although, frozen grapes do make for a healthy and delicious little snack! All you’ll need to do is process red and green grapes until they’re the size you prefer. Then, layer them in the molds and freeze them. Grapes are sweet enough that you won’t need any added sugar and juicy enough that you don’t need water. This is 100% pure grape.
Ingredients: 2 1/2 cups seedless grapes (see notes about measuring, quantities and varieties)
Instructions I measure the grapes in dry measuring cups first, before dumping them into my blender – I find that the grapes absolutely DON’T measure out the same way once they’re in the blender, due to the fact that the blender’s measurement marks are geared to measuring liquids. (For example – 2 1/2 cups of grapes, once dumped into my blender, actually measures in the blender as 3 1/2 cups – a big difference!)
- Put grapes into a blender or food processor and pulse just briefly, about 3-5 times. Although you can vary the exact consistency (from very large chunks to smaller bits of grapes), you want to be careful not to fully puree or completely liquify the grapes.
- Spoon the grape chunks into six 3-ounce popsicle molds, dividing evenly. Gently tap the molds on the countertop or use the spoon to press the grapes down, so the grape chunks are tightly compacted without air pockets.
- Pour any grape juice that remains in the blender/processor evenly over all the pops. This little bit of liquid will help to “glue” the bits of frozen grapes together as the popsicles freeze.
- Freeze until solid, then unmold and enjoy.
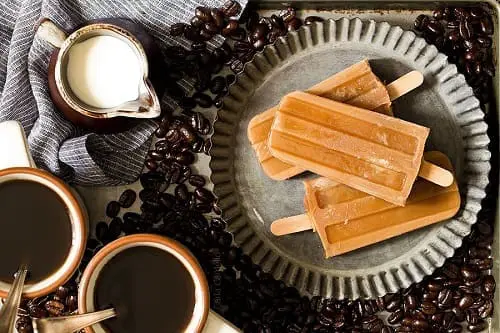
Iced Coffee Popsicles Hands up if you can’t leave the house without stopping at Starbucks for an iced coffee. Same. Even in the dead of winter, I love iced coffee. So, obviously, I was beyond excited to try these iced coffee popsicles! When mixing and freezing, be sure that the milk and coffee are both cold, otherwise, you might see ice crystals form inside. For added indulgence, try drizzling some caramel into the mold before pouring in the coffee.
Ingredients
- 1 cup cold coffee
- 1/4 – 1/2 cup cold milk
- 1 – 4 tablespoons granulated sugar
Instructions
- Whisk together the coffee, milk, and sugar. Taste and adjust to your liking.
- Pour into popsicle molds or paper cups then insert wooden sticks. Freeze until firm, preferably overnight.
- Feel free to adjust to your taste.
- It’s important the coffee and milk are cold because that will help reduce the amount of ice crystals formed after freezing. The colder the mixture is, the quicker it’ll freeze. If you use room temperature ingredients, refrigerate 1 hour before freezing.
Creamy Dulce de Leche Pops As a caramel lover, dulce de leche is my biggest vice. I could eat the stuff with a spoon! Unfortunately, it’s not vegan-friendly. But this clever recipe somehow manages to get that same deep flavor, just by using dates. Being naturally sweet, dates are the perfect inclusion here, and they even add to the caramel coloring.
Ingredients
- 14 whole medjool dates (pitted // 15 dates equal ~253 g or 1 1/4 cups // if dry, soak in warm water for 10 min. then drain)
- 1/2 tsp sea salt
- 1 14-ounce can coconut cream or full-fat coconut milk (if using full-fat milk, add 1 Tbsp melted coconut oil)*
- 1 tsp pure vanilla extract
- 1-2 Tbsp maple syrup
- 1 Tbsp bourbon (optional)
Instructions
- Add pitted dates to a food processor and blend until a caramel-like paste is achieved. If you have trouble blending, add 2-4 Tbsp (30-60 ml) warm water (amount as original recipe is written // adjust if altering batch size) to help achieve the right texture – thick and spreadable. Scrape down sides as needed and blend until a thick, caramel-like consistency is achieved.
- Once the date caramel is smooth and creamy, add 1/4 – 1/2 tsp (amount as original recipe is written // adjust if altering batch size) sea salt depending on how salty you prefer it. Taste and adjust as needed.
- Scoop out caramel and set aside. Then add coconut cream (or coconut milk + coconut oil), vanilla, 1/2 cup of the date caramel, and 1-2 Tbsp maple syrup or agave nectar for additional sweetness (amounts as original recipe is written // adjust if altering batch size). Blend until creamy and smooth and taste and adjust flavors as needed. Bourbon is optional, but recommended for flavor.
- Transfer mixture to a mixing bowl, cover and chill in the refrigerator for 3-4 hours (or freezer for 1-2 hours) for best results. (If you’re impatient and can’t wait, skip this step. The Popsicles just won’t be as swirled as if you were to let the batter chill.)
- Once chilled, add the remaining caramel back in in small spoonfuls and loosely stir to combine / swirl.
- Scoop/pour into popsicle or ice cube molds (about 7-10, depending on their size // as original recipe is written) trying to evenly distribute the caramel swirls, and tap to remove air bubbles. Insert popsicle sticks and freeze for at least 6 hours or until firm.
- Once set, remove from freezer and let rest for 5 minutes to soften. Then gently pull out of molds and enjoy. Pops keep covered in the freezer for up to 1 week, though best when fresh.
Raspberry Yogurt Ice Pops – As with the strawberry recipe from above, the base for these includes berries and sugar. Again, you’ll need to macerate the raspberries to let their juices flow before stirring in the yogurt. Feel free to use your favorite plain yogurt here, including Greek, if that’s what you prefer. That’s what I used because I like the tang and the thicker texture. Of course, you can use vanilla yogurt, but if you want these to stay healthy, I would look for something fat-free.
Ingredients
- 2 1/2 cups raspberries
- 3 1/2 tablespoons raw sugar
- 2 1/2 cups Stonyfield full fat plain yogurt
Instructions
- Place the raspberries in a bowl and slightly mash with a fork.
- Top with sugar and set aside about 10 minutes to let the juices release from the berries.
- Add the yogurt and stir together.
- Divide the mixture evenly into the popsicle molds, or disposable small plastic cups. Insert the sticks and freeze until solid, at least 5 to 6 hours
Avocado Lime Popsicles What better way to get the kids to eat their veggies than to hide them in a popsicle? Avocados are full of good fats and loaded with all kinds of vitamins and potassium.Being so creamy, they make the perfect addition to these stunning pale green popsicles. And adding lime to the mix couldn’t be better. These aren’t super sweet, which I personally really enjoy. But, if you wanted a little extra something, try blending in some frozen bananas, too.
Ingredients
- 1 Avocado, Large, seeded and flesh removed (about 1 cup of avocado)
- 1 13.5 oz can full fat coconut milk
- 1/4 cup Swerve, or Truvia
- 1 tablespoon lime juice
Instructions
- Place all ingredients into a blender and mix until well blended. You will have a rather thick mixture at this point.
- Pour into 6 popsicle molds and freeze for 4-6 hours.
- Alternatively, churn in an ice cream mixer and serve when set.
- The high-fat content also makes smoothies, as well as these popsicles, extra creamy and smooth. This is why you don’t need eggs in these popsicles. They freeze hard and are not grainy at all!
- They’re not exactly low calorie, but are very filling, so you might want to freeze in small popsicle molds for kids.
- You must use the lime in this recipe to keep your avocado from turning a weird brown colors. You can substitute lemon instead if you prefer it, but some citrus juice is needed for sure.
- You can use heavy cream or half and half in place of the coconut milk, and you can definitely use real sugar if you’re not low carbing.
- You can consider dipping the tops of these into a little melted chocolate for a little added treat. I suggest Lily’s All Natural Dark Chocolate Premium Baking Chips as they’re Stevia sweetened · and vegan friendly.
- If you need a good, solid blender, check out Vitamix Blenders. They’re wonderful blenders and they’re what I use in my own kitchen.
- I love these popsicle molds, although they do make very large bars. They are very easy to get a neat and clean popsicle to pop out of them without any issues.
- You can also use these more traditional molds.
Strawberry Mango Margarita Popsicles This recipe uses Sandra Lee Cocktail Time Strawberry Margarita, so it’s not one for the kids. This mix includes blue agave silver tequila and triple sec liqueur, though another dash of tequila wouldn’t hurt, right? I love that these popsicles also call for mango juice and fresh mango. Don’t be shy with the fruit, and feel free to add fresh strawberries to the mix.
Ingredients
- 2 cups Strawberry Margarita
- 1 ¼ cups mango juice
- 1 ½ cups mango chopped
Instructions
- Mix together the Sandra Lee Cocktail Time™ Strawberry Margarita and the Mango juice.
- Stir in the chopped fresh mango. · · Pour into popsicle molds and freeze for 6+ hours.
- Depending on the size of your popsicle molds you will probably wind up with more than 6!


